Blocking Harmful User Agents: Defender for Cloud Apps and Conditional Access

Summary#
An often overlooked control that your organization may already pay for, but underutilize, is Defender for Cloud Apps + Conditional Access policies. These are surprisingly effective, straightforward to set up, and granular once you get a handle on the process. In my cloud apps hardening journey, I found that this specific use case (and many more!) are not well documented or laid out as clear as they could be in Microsoft documentation. Instead of paying a third-party for their bespoke product, you can leverage the capabilities of MDCA and conditional access to act as a reverse proxy for your Entra ID user authentication traffic.
Requirements#
| Requirement | Notes |
|---|---|
| Microsoft Defender for Cloud Apps | Enabled and licensed |
| Microsoft 365 and Microsoft Azure app connectors | Enabled in MDCA |
| Security Administrator and Conditional Access Administrator Roles | Entra ID |
| Group of test/pilot users | For staged rollout |
| (Optional) Microsoft Sentinel / Entra ID logs | For hunting harmful user agents |
| (Optional) Security group for exclusions | For known-legitimate user agents |
Hunting for Harmful User Agents & Auditing Business Use#
To get started, I have put together a list of harmful user agents that are commonly used in business email compromise, password spraying, and credential stealing campaigns. Some of the most commonly seen examples in 2026 are axios, AADInternals, and BAV2ROPC. Some of these have legitimate use cases, so it is important to audit your environment before blocking (unless you need an excuse to break things on a Friday afternoon!).
If you use Microsoft Sentinel, we can utilize the SigninLogs table and some basic KQL querying to both hunt and audit for suspicious and pesky user agents.
Query 1: Failed Sign-ins by Suspicious User Agent#
This custom KQL query will return a list of failed sign-ins for a predetermined list of bad user agents, the Entra UPN/AlternateSignInName, UserAgent, User Display Name (Identity), App Display Name, authenticating client, and failure reason. Depending on the size of your tenant, you will want to adjust the time range. For tenants with thousands of active users, I recommend reviewing at least a few days of activity.
SigninLogs
| where TimeGenerated >= ago(3d)
| where UserAgent has_any ('axios', 'AADInternals', 'Azsdk-python', 'aiohttp', 'AZURECLI', 'KrbRelayUp', 'BAV2ROPC', 'okhttp', 'node')
| where ResultSignature == 'FAILURE'
| summarize arg_max(UserAgent, Identity, AppDisplayName, ClientAppUsed, ResultDescription) by AlternateSignInName
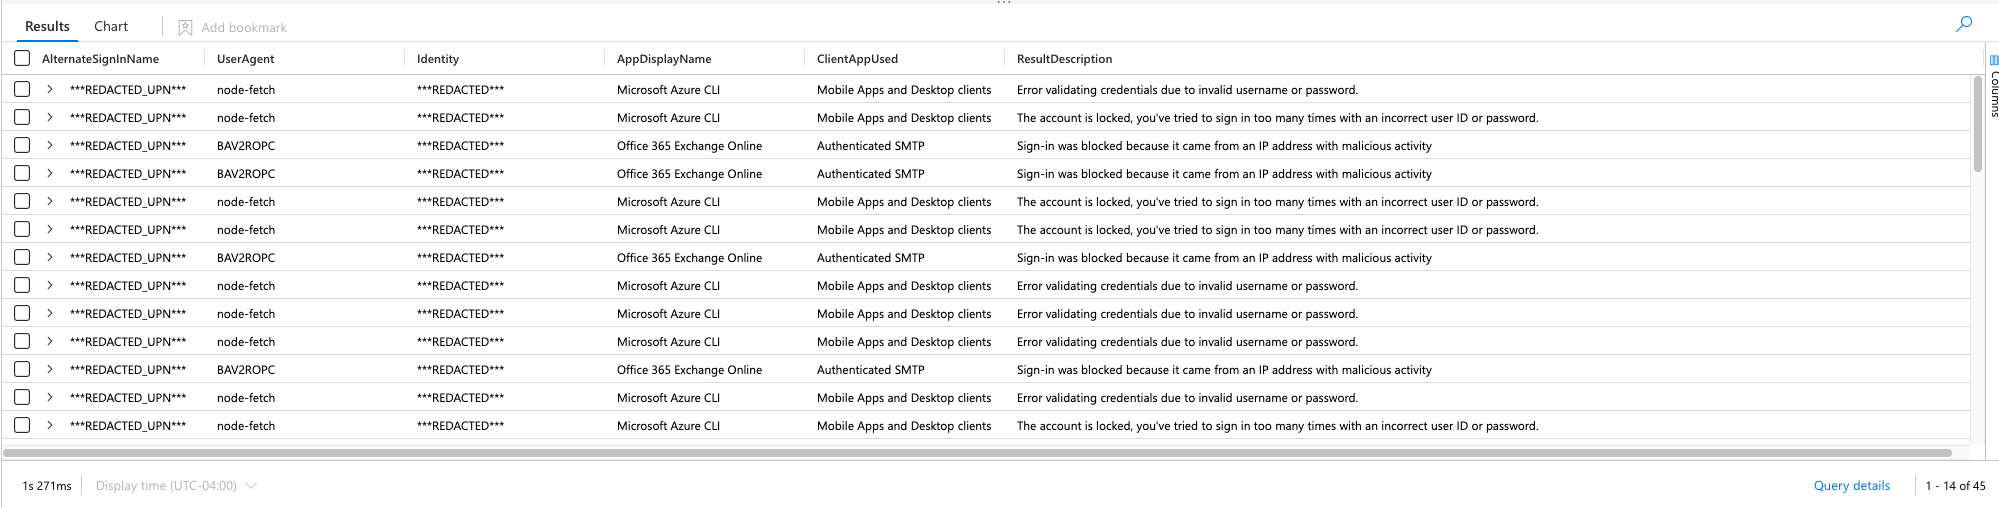
The reason this simple query is powerful for our use case is:
- It provides us with a test group of users that are already being targeted with harmful user agents
- It shows us which user agents are associated with attacks against specific applications
- We can see how the authentication was performed
- It can be easily changed to fit your needs
Query 2: Discover All Unique Failing User Agents#
You can also not specify specific user agents, and use the distinct operator to look at all unique user agents that failed authentication over a specific time period – this is how I hunted for my list:
SigninLogs
| where TimeGenerated >= ago(3d)
| where ResultSignature == 'FAILURE'
| distinct UserAgent, AppDisplayName, ClientAppUsed, ResultDescription
Query 3: Successful Sign-ins by Suspicious User Agent#
We also should look at the same user agents, but for SUCCESS sign-in results. We’ll want to do this to look out for any legitimate business use applications and it will give us insight to any unwanted behaviors or gaps in our conditional access policy enforcement:
SigninLogs
| where TimeGenerated >= ago(3d)
| where UserAgent has_any ('axios', 'AADInternals', 'Azsdk-python', 'aiohttp', 'AZURECLI', 'KrbRelayUp', 'BAV2ROPC', 'okhttp', 'node')
| where ResultSignature == 'SUCCESS'
| summarize arg_max(UserAgent, Identity, AppDisplayName, ClientAppUsed, ResultDescription) by AlternateSignInName
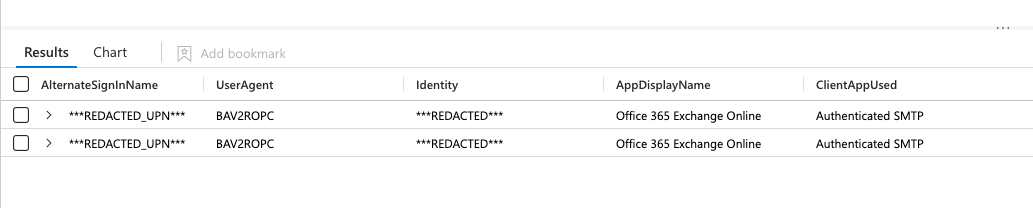
Although my results are redacted, I recognize the two identities listed in my successful results as legitimate business activity and will add them to a security group for exclusion later in our Defender for Cloud Apps access policy and conditional access policy. For this purpose we’ll call the security group Legacy_UserAgents and add the necessary users, until they can be upgraded to a more secure method of authentication.
Step 1: Onboard Applications to Defender for Cloud Apps#
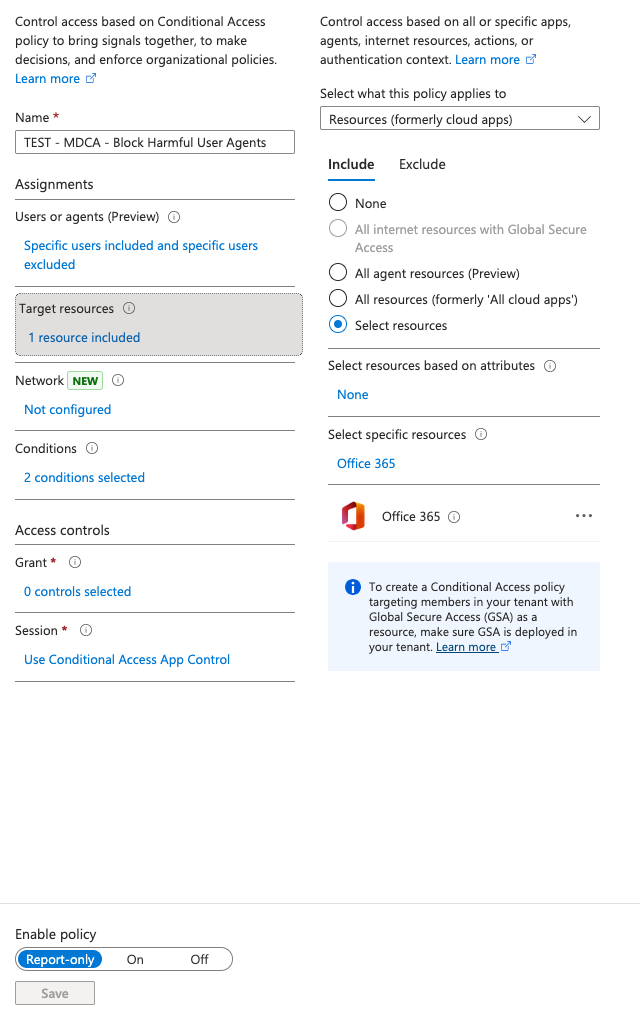
If you haven’t onboarded any Office 365 applications into Defender for Cloud Apps, the easiest way is to create a new conditional access policy scoped to your user and target apps and apply the session control “Use Conditional Access App Control”. Here is a snapshot of my example policy for onboarding:
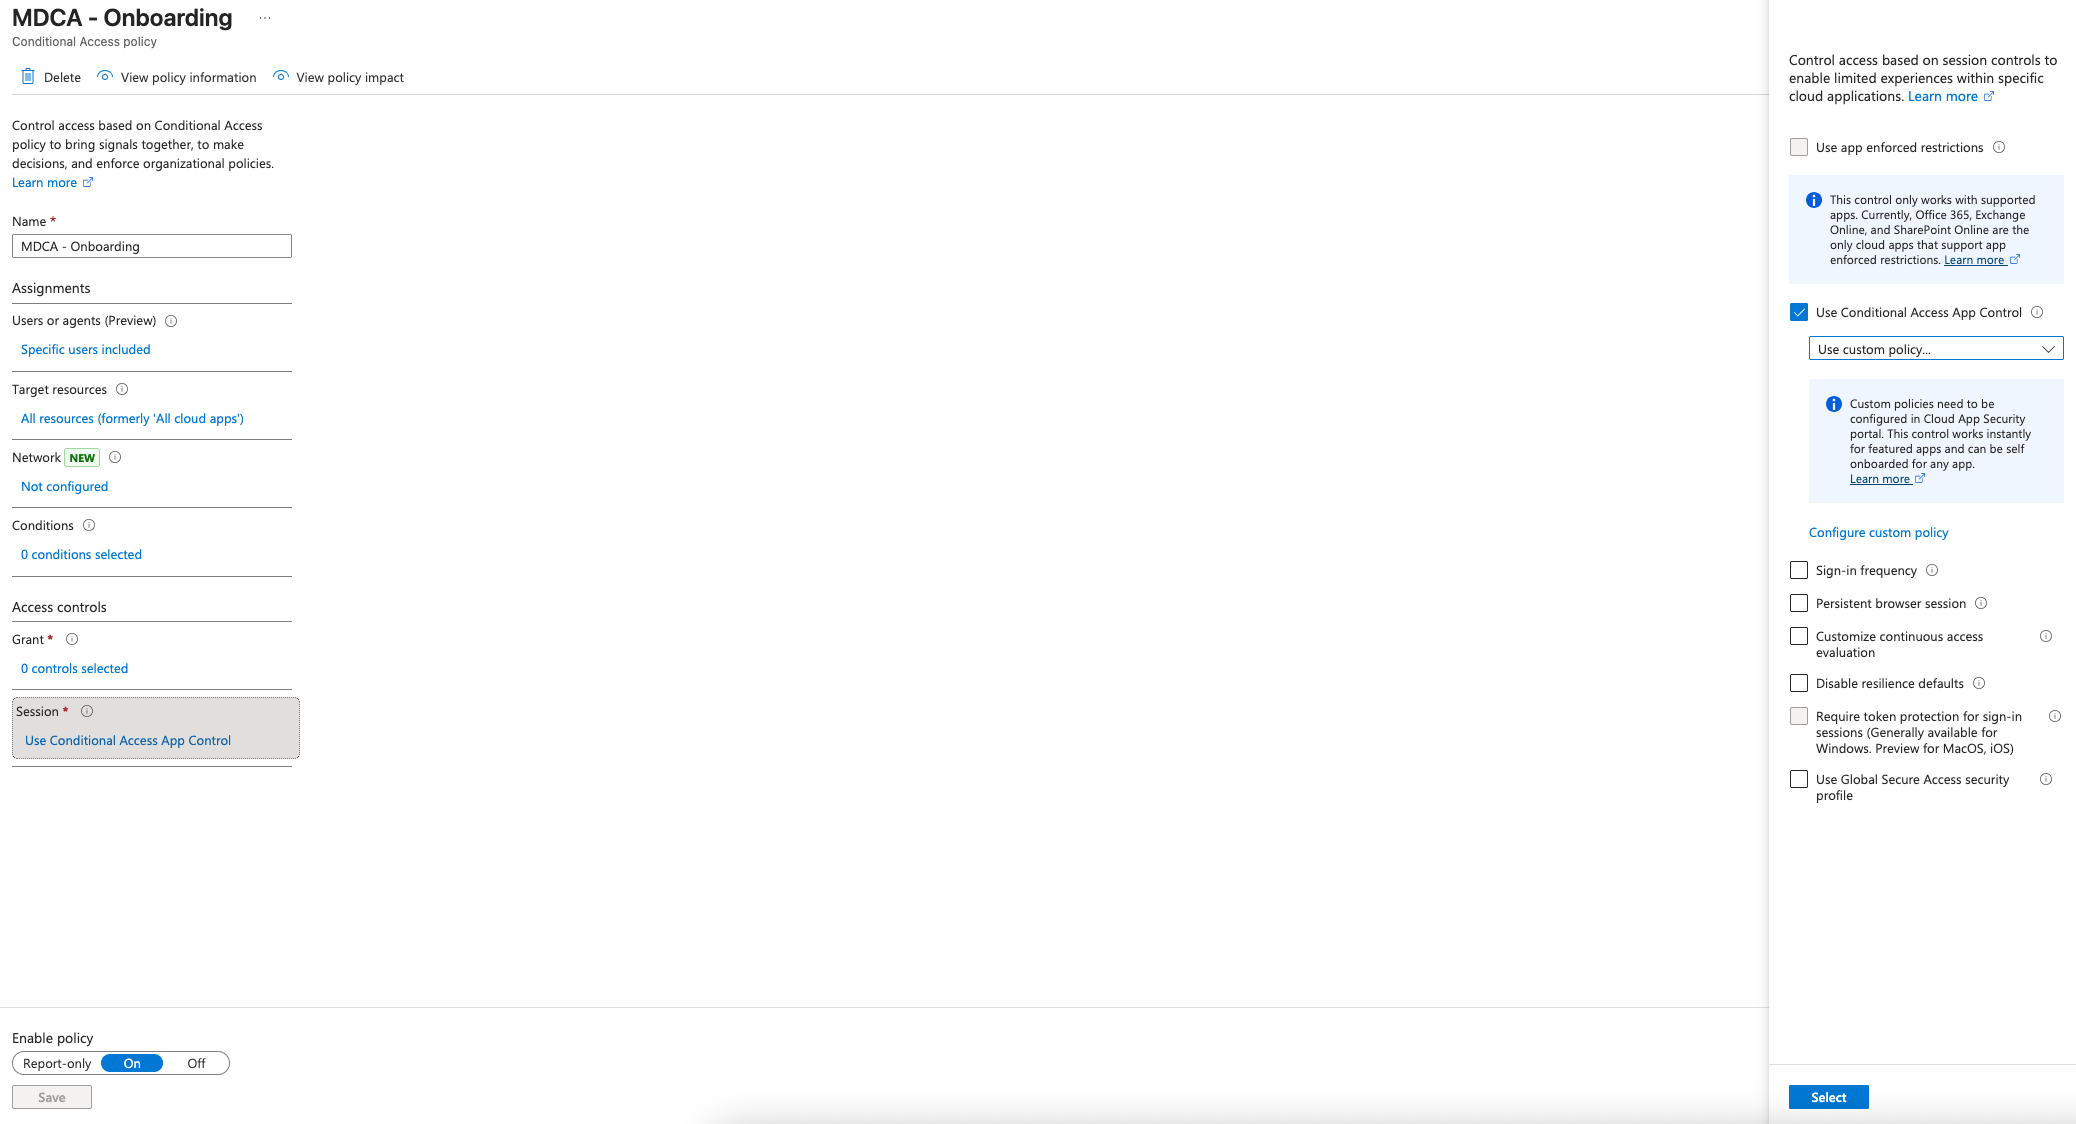
You can target all resources like I have here, if you want to onboard as many apps as quickly as you can. For the purposes of this policy, having it set to Office 365 as the target resource will be sufficient. For the user, you can use any user account (such as your own) that has access to an E5 license. You do not need to change the default of Use custom policy... for the Use Conditional Access App Control setting.
Once you’ve saved the policy, you can start logging into Office 365 apps with your target user account in an incognito window. After 10-15 minutes they will start populating in the Defender for Cloud Apps portal under:
Settings > Cloud Apps > Connected Apps > Conditional Access App Control Apps
https://security.microsoft.com/cloudapps/settings?tabid=conditionalAccess

Step 2: Import the Exceptions Group#
Before creating the policy, if you have exceptions be sure to import them into MDCA from:
Settings > Cloud Apps > System > User Groups > Import User Group
https://security.microsoft.com/cloudapps/settings?tabid=userGroups
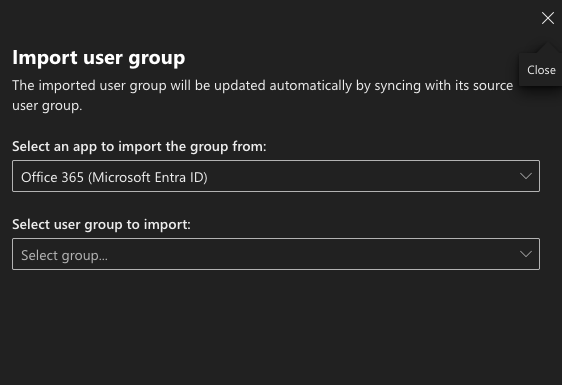
Note: It may take a few hours depending on Azure conditions and your tenant size to populate the group.
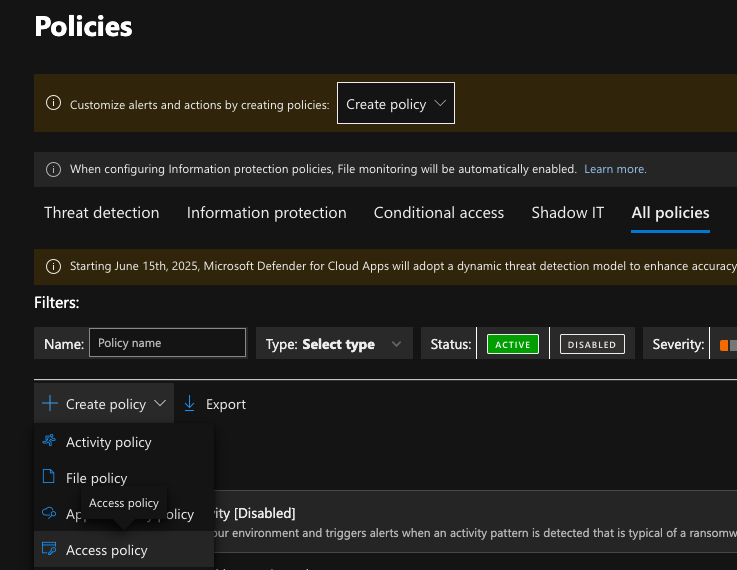
Step 3: Create the Access Policy in Cloud Apps#
Navigate to:
Cloud Apps > Policies > Policy Management > Create Policy (Access Policy)
https://security.microsoft.com/cloudapps/policies/management
Once in the policy screen, add your preferred severity settings, category, and description. Next, depending on what model your environment uses, you can modify the default Intune compliant and hybrid-joined filter. For this policy, in most cases, you can leave this at default. Add your onboarded/scoped apps and user agents, and exclusion group (if applicable) following the below screenshot as reference:
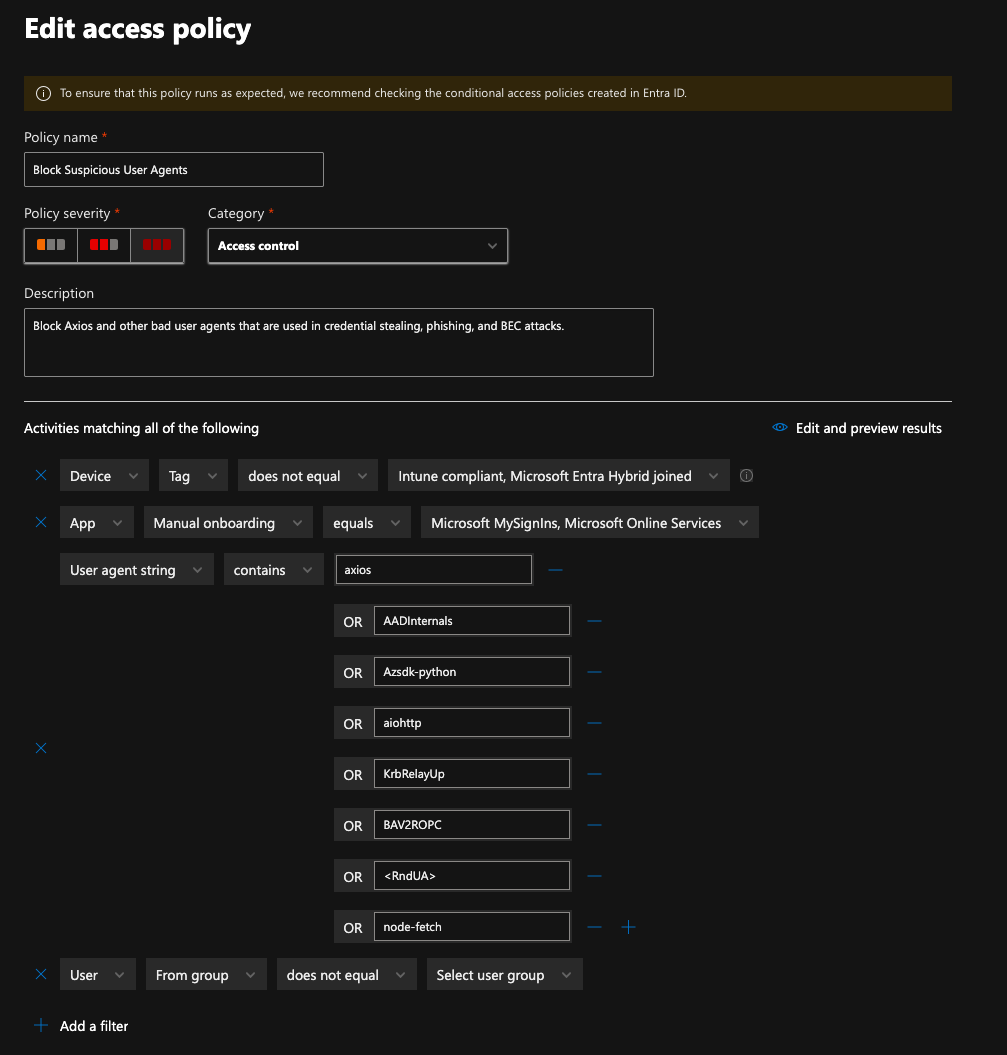
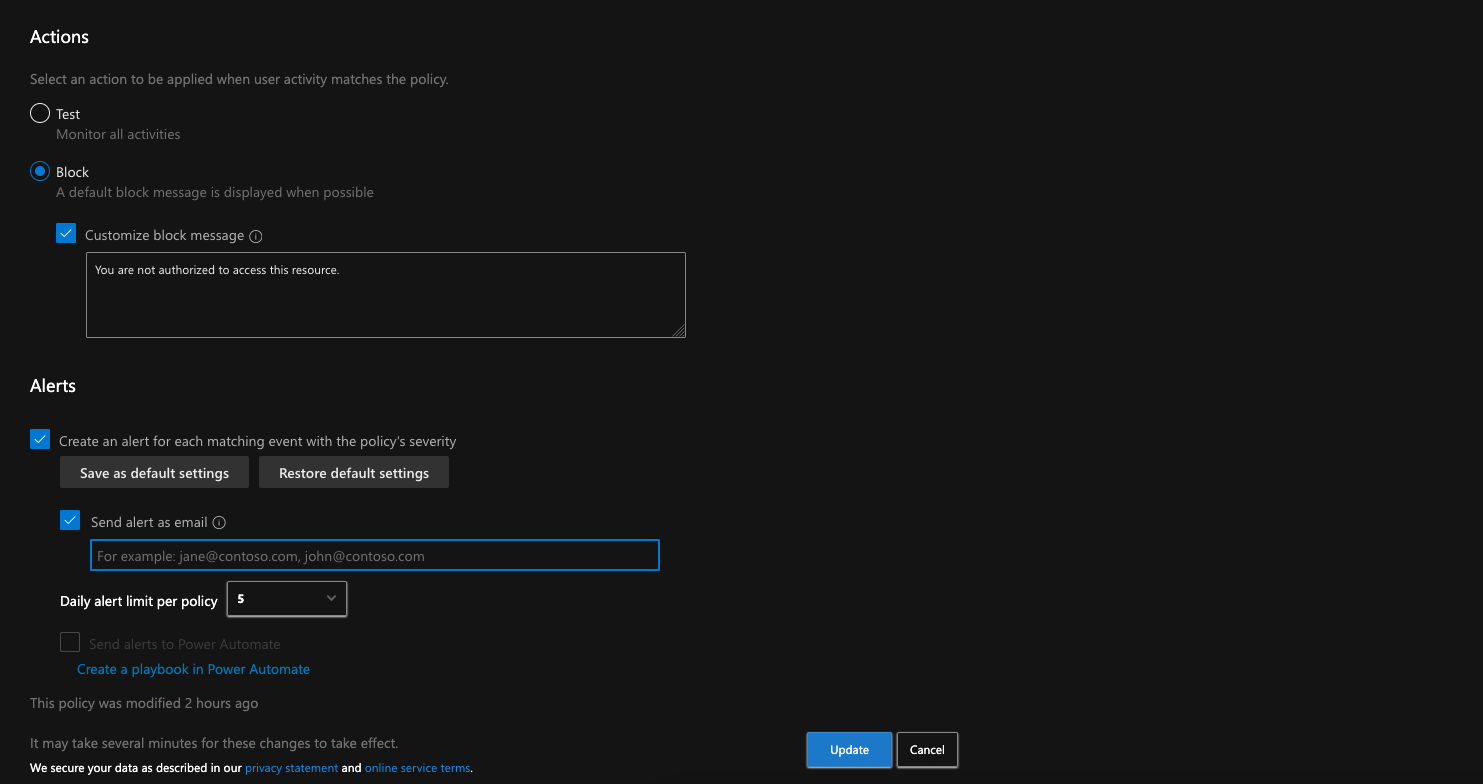
Tip: You can choose whether to put the policy in Test or Block mode to start. I’m using Block mode because I will have our enforcing conditional access policy in report-only mode to monitor before rolling out to the entire tenant.
Step 4: Create the Harmful User Agent CA Enforcement Policy#
Remember the query we ran earlier and how it returned a list of users? Now is a good time to reference that list for our policy assignments (bonus points if you imported the users into their own pilot security group).
Create a new conditional access policy with the following details:
| Setting | Value |
|---|---|
| Name | MDCA - Block Harmful User Agents |
| Users: Include | Specific pilot users / user group |
| Users: Exclude | Security group for exclusions (if applicable) |
| Target Resources | Office 365 |
| Client Apps | Browser, Mobile apps and desktop clients, Exchange ActiveSync clients, Other clients |
| Session | Use Conditional Access App Control: Use custom policy... |
If testing in report-only mode, also add:
| Setting | Value |
|---|---|
| Device Platforms: Configure | Yes |
| Device Platforms: Exclude | Android, iOS, macOS, Linux |
Once you have created the policy, save and monitor for a few days to a week to determine any impact. You can use Insights and Reporting to monitor your policy for any successes and failures during that timeframe:
https://portal.azure.com/#view/Microsoft_AAD_ConditionalAccess/ConditionalAccessBlade/~/InsightsAndReporting/
After done monitoring, switch the policy to On and modify the Device Platforms condition from:
Device Platforms > Configure (Yes) > Exclude: Android, iOS, macOS, Linux
to:
Device Platforms > Configure (Yes) > Include: Any device, Exclude: (Uncheck all)
That’s it. Now you have another layer of defense for those suspicious sign-in attempts that eventually trickle into user and sign-in risk. If your organization is constantly dealing with abusive sign-in attempts from suspicious (or otherwise specific) user agents, this should help cut down the noise and is scalable to specific third party applications as well.
References#
- https://github.com/mthcht/awesome-lists/blob/main/Lists/suspicious_http_user_agents_list.csv
- https://learn.microsoft.com/en-us/defender-cloud-apps/access-policy-aad
- https://learn.microsoft.com/en-us/defender-cloud-apps/control-cloud-apps-with-policies
- https://www.securityhq.com/blog/adaptive-defense-how-cloud-app-policies-can-block-malicious-user-agents/